Deze post in het NEDERLANDS lezen? Klik hier
 |
Quirky Dutch Summer Do you have no idea what ‘Quirky Dutch Summer’ is all about? Read this post first. There is a Facebook group for sharing your QDS work here. QDS 2019 runs from June 10 – August 12. There will be an inspiring quirky post up on this blog every Monday during the Dutch Summer. |
Hi, hello, goodmorning, Quirky Dutch Summer is back!
Welcome to all my Quirky online friends who, of course, are eager (at least I hope so…!) to read the first inspiration post of this series. It was about time that I picked up the QDS series again… the last series ran in 2015. I planned to organise another QDS series last year but, as most of you know, an unexpected housemove threw a spanner in the works … well, not a spanner – it was magic powder because my beloved and I wanted nothing more than leave that ‘scary flat’ that we – due to circumstances – were forced to live in.
Anyway, we moved and settled in our new apartment and it’s with a lot of happiness and extra energy that I can focus on Quirky Dutch Summer series now. A year later than planned also means that the enthusiasm (on my part) to jump in is even bigger than ever. We are going to make it a wonderful, creative Dutch Summer!
I said ‘we’ – because as announced, I am not the only one who writes inspiring blogposts in this series. There are a number of enthusiastic guest artist-bloggers ready to share their inspiration with you too! Over the next few weeks you will see them pop up on this blog one by one.
I wish you a wonderful, inspirational Quirky Dutch Summer!
QDS #1. Journal with a canvas cover
I kick off this Quirky Dutch Summer series with a tutorial that shows you how to bind a simple art journal – the journal looks a bit like a school exercise book (is that the right word for it?) with a soft cover and the fun is in the cover… it is made out of canvas. I got this idea a few months ago, when a friend (hi Marie!) visited me and brought her art journal… I was not only seized by the work in her self-made journal but also by the journal itself, especially the canvas cover: … but where did you gét that? It’s quite a hassle to find a piece of canvas… ” I said. “Of course not” she replied, “you just buy a cheap prepared canvas in a dollar store and cut the cloth from the frame…!”
How come I never thought of that myself…?!
So I went to a store that sells cheap canvasses – you probably have those in your neighbourhood too – and I created my first canvas-covered-journal (see this blogpost) A journal like this is easy to make and the binding is super-simple, it’s the cover that makes the journal look special and you know what? YOU can do it too!
So I made another journal like that and photographed the process… are you ready? Then Quirky Dutch Summer starts NOW…!
What do you need?
- (Cheap) canvas
- Craft knive
- Ruler, pencil
- Glue (I use bookbinding glue but other glue will probably work as well)
- Bookbinding thread (waxed cotton or other strong thread will do)
- Acrylic paint, stencils, brushes, brayers, palet knives or old credit card (and/or other ‘things’ to decorate your cover. You can think of stamps, collage images et cetera – see tutorial)
- Paper for the pages/content (see tips and ideas in this tutorial)
Buy a cheap canvas – mine costs 1.39 Euro (1.56 American dollar)
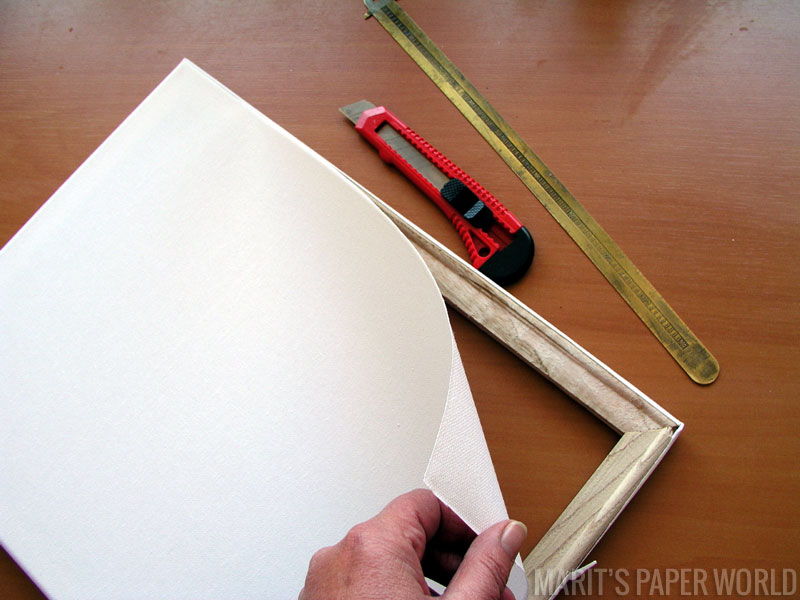
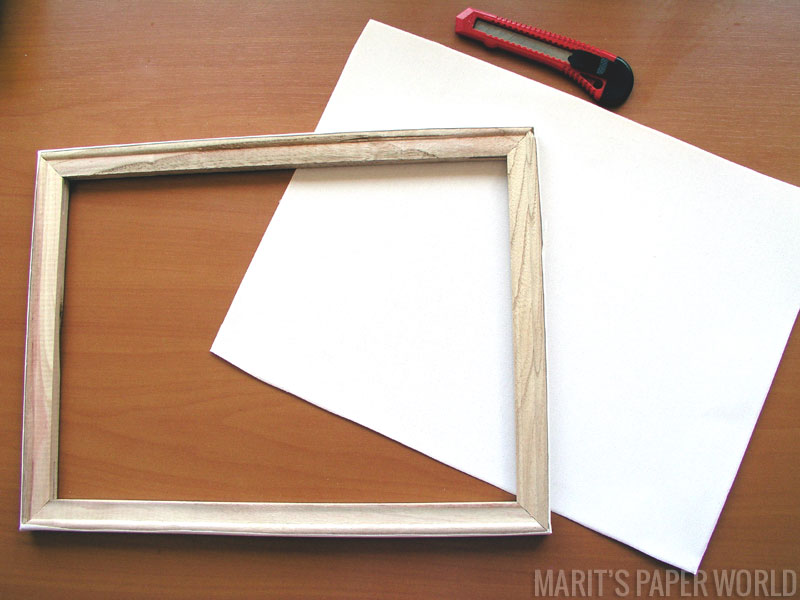
Cut the canvas cloth from the frame.
You can of course try to get the staples out (but that will cost you your nails and leave little holes in the canvas) or cut at the back of the frame but I keep it simple and cut the cloth at the front of the frame (see photo.) I don’t bother about the size – I will cut my content-paper later so that it fits the cover.
And the wooden frame? I think I’ll keep it (if I can find a space where I can store it in my overstashed atelier) I can probably use it someday in the future…
The cut out canvas is of course never quite straight… so I draw a neat rectangle and cut the canvas to square.
And here’s my plain cover! I do want to fold the edges though, to help the edge look nice and the journal will be easier to open.
Wait, I’ll get my first-made journal so I can show you. See? There’s a hem of approximately a centimeter and a half (a little less than an inch.)
It’s a good thing I looked at this older journal because now I notice that I did not decorate the back of the cover, it’s plain white and that doesn’t look nice.
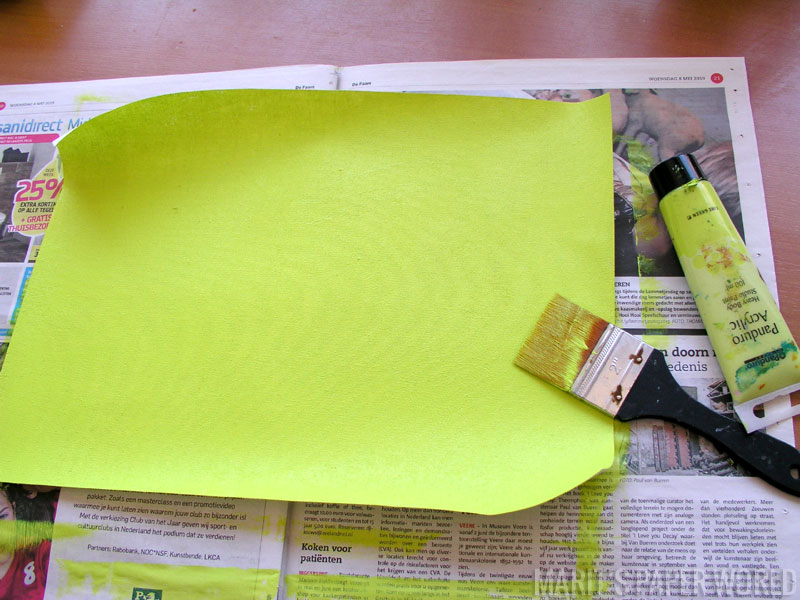
I choose ‘lime’ to paint the inside/back of the cover, it looks quirky and happy now doesn’t it? (“Which side of the cloth is front and which is the back” you might ask? Well, the back of your canvas looks just a little different than the front; slightly less ‘smooth/prepared’, but it doesn’t matter much what side you put up.)
When the back is dry, flip over the canvas ’cause we will work on the front now. I used acrylic paint and stencils to decorate the front but you can use all kinds of materials and techniques… you could make a collage on the front, for example (but you will loose that ‘canvas/cloth look’ then) or stamp on it and maybe even spray ink will work? (I did not try that, I’m affraid the ink will not dry nicely and stain.)
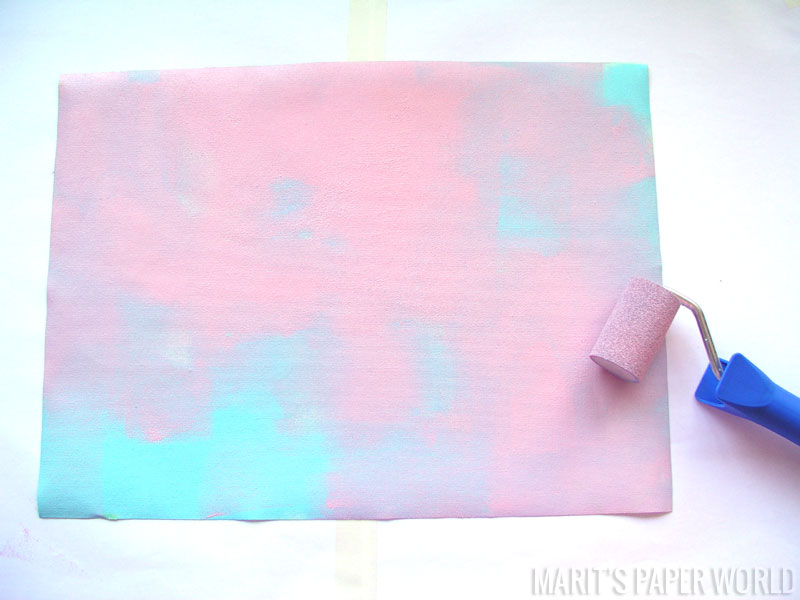
I choose bright, happy, ‘sunny’ colors and used a brayer to add the basic layer on the canvas cloth.
And now the fun starts: I took out some stencils (and a toilet roll, I like toilet rolls to stamp with!)
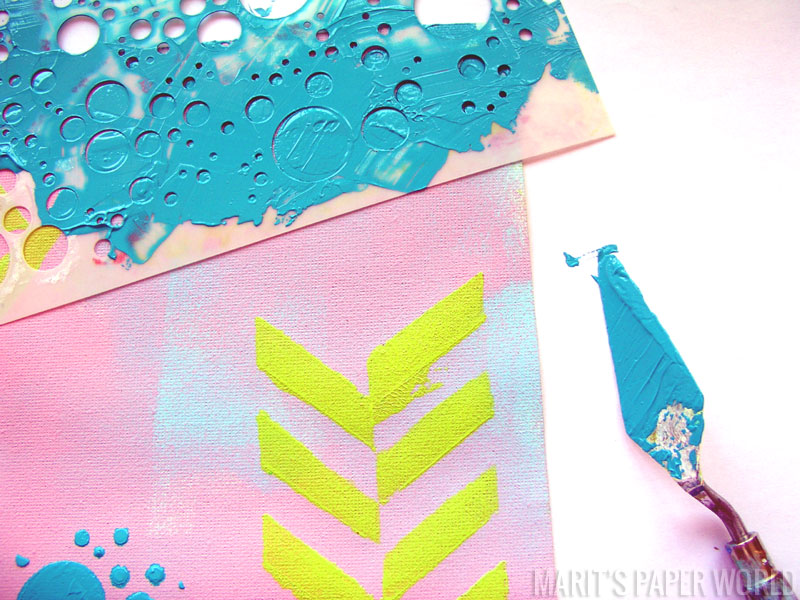
You can dab the paint through the stencil with a brush (use an old brush) That way, you can apply a thin layer of paint (see the yellow herringbone motive.) You can also use a palet knife (or credit card) to smear the paint through the stencil, which gives a thick layer that adds dimension to the design.
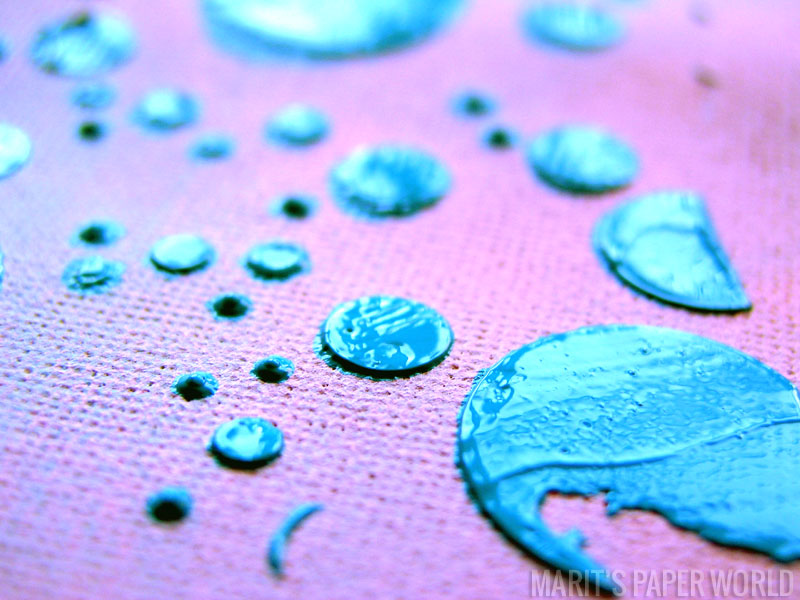
Here’s a detail of the latter… the paint lays onto the surface.
Do take the time to let the paint dry before adding another design/color (use a heat tool to speed up the process) otherwise you will smear the wet paint when you put another stencil on it too soon.
Decorate your canvas cover the way you like… what is your style? What do YOU like? Do you prefere a calm cover – using colors in the same scheme – or do you want to go wild and add all the colors of the rainbow? It’s totally up to you!
In the end I used three stencils (the ‘herringbone’ one, the circles and the triangles.) I alse used bubble plastic and the toilet roll to stamp paint. Decorate the piece of canvas until you are satisfied with it. NOTE: if you want to add text and/or an image on your cover, stay away 0.7 inch (1,5 cm) from the edges. Remember, we will fold the edges!
Are you ready? Are you satisfied with the way your cover looks? Is the canvas dry?
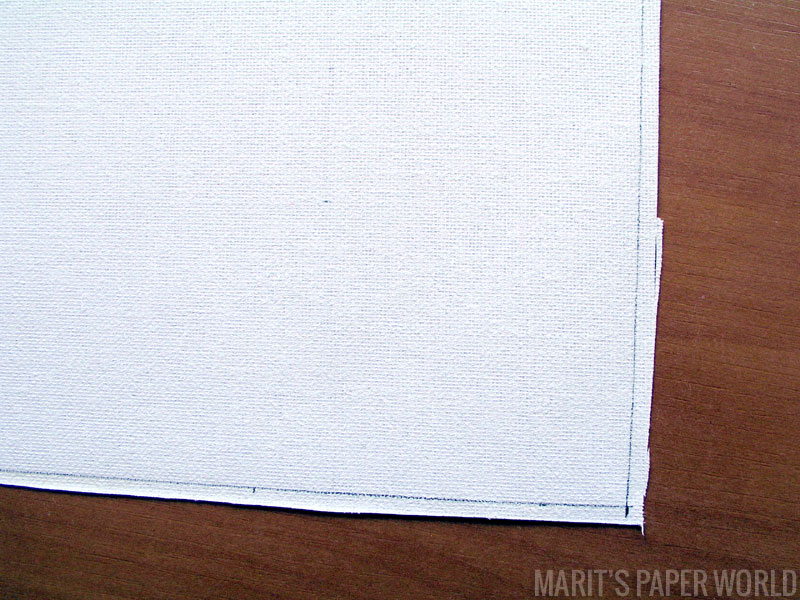
Then turn it around and draw a thin line 0.7 inch (1,5 cm) from the edges (see image.) Cut the corners as indicated on the photo.
Fold and glue the edges.
So, that’s your cover! Now we go work on the content… I used per signature (in bookbinding, the word ‘signature’ refers to a group of sheets, folded in the middle, and bound into the binding together.) two sheets of thick paper. That means that there will be four pages per signature. I bind four signatures so in total (let me calculate…) I will have 16 pages in my journal. Yes? Can you follow? You can of course use more or less signatures/sheets/pages.
I used 180 gr/83 lbs Schut drawing paper but you can fill your journal with whatever paper you want (lined paper, colored paper or even fabric.) When you use thin paper, you might want to put more sheets into a signature… set up a content you like.
The size of the canvas cover is the size of the sheets minus ‘something’. Because the canvas cover folds to close the journal, the pages have to be smaller than the cover.
Let me show you: because you fold the canvas around the signatures, the signatures protrudes from the cover. I cannot give you exact measurements on this because it all depends on the size of your canvas and your paper… but I can show you!
Bundle your signatures and fold your cover around it as shown.
See how much your pages stick out? Now measure how much you need to cut from the sheets to make them fall nicely into the cover.
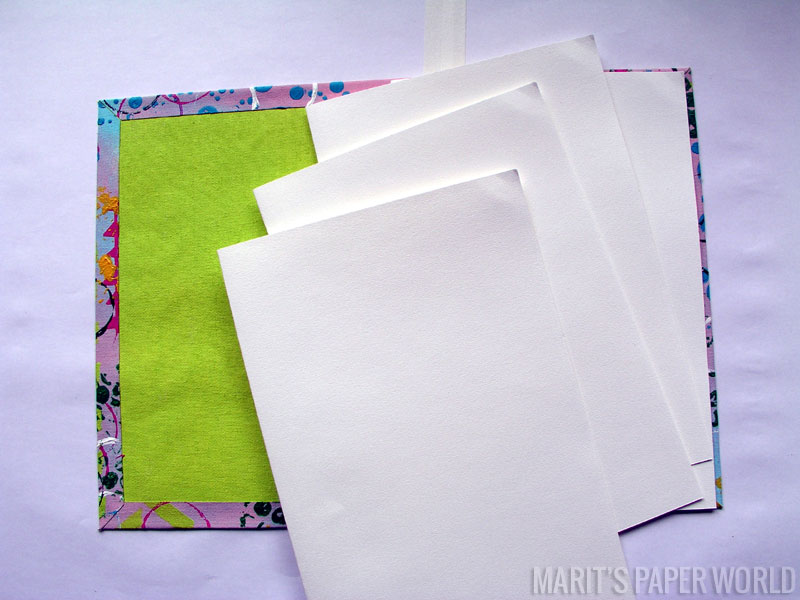
Fold open, my sheets look like this.
Next, we will prepare the cover for binding the signatures.
For a start, find the middle of your cover.
I have four signatures to bind – so I draw four thin lines from the middle with a 0.3 inch (o,5 cm) distance from each other. (My ‘mid-line’ is in between the inner two lines, see that?) When you have more signatures to bind, draw more lines. (If you have an uneven number of signatures, bind one exactly in the middle.)
Now mark the place of the holes – the easy ones are the ones that are exactly in the middle.
Put one of the sheets/pages next to the lines and decide where the top and bottom binding holes have to come… mark the place approximately 0.7 to 1 inch (1,5 to 2 cm) from the top and bottom of your pages.
Use a puncture pen or needle to put holes on the marked places and do the same with your paper signatures/content. The most simple way to do that is to punch/prick the holes into one sheet of paper and then use this sheet as a template to punch the holes into the other sheets. (Fold the sheet-with-the-holes-in-it into the next signature and stick through the already visable holes.)
Ready? Then we can start binding the signatures into the cover.
I showed this way of binding in a former Quirky post (2015) so I will now link you to that tutorial where you can find that tutorial at the end of the post (scroll down a bit to find it)
Click HERE to find the binding tutorial.
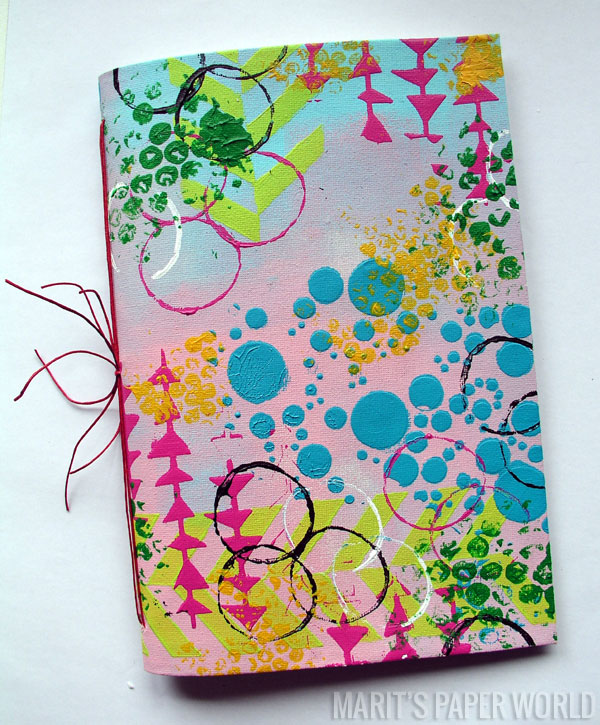
This is my finished journal.
I choose a happy color (waxed cotton) for the binding.
Have fun binding your own journal/exercise book!
I will send the above journal, that I created for this Quirky post, to one of the participants of Quirky Dutch Summer. I will get back to that in the last Quirky post (August 12.)
Did you create something inspired by this blogpost?
Use the InLinkz list at the end of this post to leave a link to your artwork/blogpost.
You can also post your work in the Quirky Facebook group
Nederlands
 |
Quirky Dutch Summer Heb je geen idee waar ‘Quirky Dutch Summer’ (Grillige, Hollandse zomer) over gaat? Lees dan eerst deze post. Quirky Dutch Summer heeft ook een eigen Facebook groep, die vind je hier. QDS 2019 duurt van 10 juni tot 12 augustus. Gedurende deze zomer zal er elke maandag een inspirerende, ‘Quirky post’ worden gepubliceerd op mijn blog. |
Hallo, goedemorgen, Quirky Dutch Summer is terug!
Welkom aan al mijn Quirky online vrienden en vriendinnen die natuurlijk (dat hoop ik tenminste…!) staan te popelen om de eerste inspiratie post van deze serie te lezen. Het werd wel weer eens tijd ook, dat ik de QDS serie oppakte… de laatste stamt alweer uit 2015. Ik was het vorig jaar echt van plan maar zoals de meesten wel weten kwam er toen een onverwachte verhuizing tussendoor die roet in het eten gooide… of, nou ja, geen roet maar ‘magic powder’ want mijn lief en ik wilden niets liever dan wég uit de ‘enge flat’ waar we wegens omstandigheden in terecht waren gekomen. Enfin, we zijn dus verhuisd en gesetteld en heel gelukkig in ons nieuwe appartementje en nu kan Quirky Dutch Summer dan echt weer van start gaan. Een jaar later dan gepland betekent ook dat het enthousiasme (van mijn kant) nóg groter is om je te inspireren en om er een prachtige, creatieve zomer van te maken.
Zoals aangekondigd ben ik niet de enige die je inspirerende blogposts voor ga schotelen… er staan een aantal enthousiaste gastbloggers te springen om hun inspiratie met jullie te delen! De komende weken zie je ze allemaal voorbijkomen.
Ik wens je een prachtige, inspirerende Quirky Dutch Summer!
QDS #1. Journal met canvas kaft
Ik trap deze Quirky Dutch Summer serie af met een tutorial die laat zien hoe je een simpel art journal kunt binden – het journal lijkt een beetje op een schoolschrift met een slappe kaft maar het leuke is, dat je die kaft van canvas maakt. Ik kreeg dit idee enige maanden geleden, toen een vriendin (hai Marie!) me bezocht en haar art journal meenam… ik werd niet alleen gegrepen door het werk ín haar zelf-gemaakte journal maar ook door de kaft, die ze had gemaakt van canvas “… maar waar háál je dat dan? Het is nogal een gedoe om los canvas te kopen lijkt me…” zei ik. “Welnee” was haar antwoord, “je koopt gewoon zo’n goedkoop geprepareerd doek en dat snijd je dan los van het frame.”
Dat ik dáár nou zelf nooit aan gedacht heb…!
Op naar de Action dus… en mijn eerste canvas-kaft-journal was een feit (zie deze blogpost) Zo’n journal(tje) is heel simpel te maken – de pagina’s zijn met een super-simpele steek ingebonden, het bijzondere zit ‘m in de uitstraling van de kaft – en dat kun JIJ ook!
Ik maakte dus nóg zo’n schrift-journal om jullie te laten zien hoe ik het deed. Ben je er klaar voor? Dan trappen we Quirky Dutch Summer NU af…!
Wat heb je nodig?
- (Goedkoop) canvas doekje
- Snijmesje (Stanley mes, afbreekmesje)
- Lineaal, potlood
- Lijm (ik gebruik boekbindlijm)
- Boekbind draad (waxed katoen of ander sterk draad)
- Acryl verf, stencils, kwasten, verfrollertje, paletmes of oude creditcard (of iets anders om je kaft te bewerken… denk collage b.v. – zie verderop in tutorial)
- Papier voor de inhoud (zie tips/ideeën over inhoud verderop in tutorial)
Koop een goedkoop canvas doekje (ik kocht de mijne bij de Action voor 1,39 euro)
Snijd de canvas los van het houten frame.
Je kunt proberen de nietjes eruit te peuteren (maar dan heb je gaatjes in de rand van je canvas) of de canvas aan de achterkant los snijden maar ik houd het graag zo simpel mogelijk… ik snijd dus aan de voorkant het doek los.
En dat frame-pje? Daar kan ik vast later nog wel iets mee, dus dat bewaar ik (als ik nog een plekje kan vinden om het op te bergen *lol*)
Het uitgesneden canvas is natuurlijk nooit helemaal recht… ik teken een keurige rechthoek af op het losse doek en snijd het canvas nu mooi haaks uit.
En dit wordt mijn kaft… maar ik wil wél een omslagje aan de randen, zodat ik het journal straks wat makkelijker kan openen én om de rand mooi af te werken.
Wacht, ik pak even mijn voorheen gemaakte journal erbij zodat ik het kan laten zien… kijk, een ‘zoompje’ van een centimeter of wat. Ik zie nu ook meteen dat ik de achterkant van dit doekje niet heb bewerkt… dat ‘wit’ ziet er maar kaal uit, dat ga ik nu anders doen!
Ik geef de binnenkant van mijn kaft-in-wording een kleurtje: “Lime Green”, lekker quirky en zomers, toch?! (En wat is nou de voor- en wat is de achterkant zul je misschien vragen? Nou, de achterkant van je canvas ziet er net iets anders uit dan de voorkant, iets minder ‘glad/geprepareerd’, maar in feite maakt het niet zoveel uit welke kant je ‘voor’ of ‘achter’ noemt.)
En dan nu naar de voorkant van je canvas kaft… ik gebruik acrylverf en stencils om deze te bewerken maar je kunt hier natuurlijk allerlei technieken op los laten… je zou een collage kunnen maken op de kaft (maar dan verlies je de ‘canvas look’), of stempelen en misschien werkt spray inkt ook wel (of zou dat blijven afgeven/vlekken? Dat heb ik niet uitgeprobeerd.)
Zelf koos ik wat zomerse kleurtjes acryl verf en rolde eerst een ‘basislaag’ op het canvas doek.
Daarna haalde ik wat stencils uit de kast (en een wc-rolletje doet het ook altijd goed!)
En toen ging ik los met verschillende kleuren acrylverf.
Je kunt met een kwast de verf door het stencil tamponeren (neem niet je beste kwast hiervoor!) Je krijgt dan een dun laagje verf op je doek (zie de gele ‘visgraat’) maar je kunt de verf ook met een paletmes (of creditcard) door het stencil wrijven. De verflaag is dan dikker en dat geeft dimensie…
… kijk maar. De verf ligt mooi óp het doek.
Laat tussendoor wel steeds je verf drogen (een heat tool versnelt het proces) zodat je met een volgend stencil/kleur niet alles uitsmeert en vlekken maakt.
Bewerk je canvas kaft helemaal zoals je het zelf wilt… wat is jouw stijl? Wat vind jij mooi? Hou je het heel rustig – een journal in aardetinten of één kleurenpalet – of trek je juist alle kleurtjes die je hebt uit de kast? Dat is aan jou!
Ik gebruikte uiteindelijk drie soorten stencils (de ‘visgraat’, de cirkels en de ‘driehoekjes’) en vulde dat aan door te stempelen met bubbeltjes-plastic en een wc rolletje. Bewerk je canvas net zolang totdat je tevreden bent. Mocht je tekst of afbeeldingen op je kaft/canvas willen gebruiken, houd er dan rekening mee dat er nog ongeveer 1,5 cm aan de randen van je beeld ‘af vallen’ (de rand wordt namelijk omgeslagen, weet je nog?!)
Ben je klaar? Is je canvas helemaal droog?
Draai het doekje dan om en teken een lijn van 1,5 cm rondom. De hoeken knip/snijd je af zoals op onderstaande foto is aangegeven.
Lijm de randen nu naar binnen.
Dan gaan we nu naar de inhoud… ik gebruikte per ‘katern’ (een katern is een groepje papiervellen die je in elkaar vouwt) twee vellen papier. Dat betekent dat je dan 4 pagina’s per katern hebt. In totaal bind ik vier katernen in, dat betekent (even rekenen hoor…) 16 bladzijden. Ja? Snap je het nog? Meer of minder kan natuurlijk ook.
Ik gebruik 180 gr. Schut tekenpapier maar je kunt je journal vullen met wat je maar wilt… gekleurd of gelinieerd papier b.v. of dikker of dunner papier. Je kunt ook meer vellen papier per katern gebruiken.
De canvas kaft is de maat van je vellen papier min ‘een beetje’ omdat je de boel dichtvouwt.
Omdat je je canvas omslag om de katernen heen vouwt, moet de inhoud wat kleiner zijn dan je kaft anders steken de bladzijden uit. Ik kan je daar geen maten voor geven omdat het allemaal afhangt van de maat van jouw kaft… ik kan het wél laten zien. Kijk… leg de katernen op een stapeltje op je canvas kaft en vouw het geheel dicht.
Je ziet nu hoeveel de pagina’s nog uitsteken. Meet op hoeveel je nog ongeveer van je pagina’s af moet snijden om de pagina’s ín de kaft te laten vallen.
Opengevouwen op het canvas ziet het er bij mij zo uit.
Nu gaan we de kaft voorbereiden voor het inbinden van de katernen.
Zoek om te beginnen het midden van je kaft op.
Ik heb vier katerenen in te binden, daarom teken ik op gelijke afstand van elkaar vier dunne potlood lijnen af (op ongeveer 0,5 cm afstand van elkaar.) Mijn ‘midden’ ligt dus tussen de binnenste twee lijnen in, zie je het? Bind je meer katernen in? Trek dan meer lijnen.
Geef vervolgens de plaats van de gaatjes aan. Er komt in ieder geval een gaatje in het midden van de lijnen.
Leg vervolgens een katern naast de lijnen en bepaal waar je boven- en ondergaatjes moeten komen. Deze komen 1,5 tot 2 cm vanaf de rand van je papier/bladzijde. Teken die gaatjes af op je canvas.
Prik nu de gaatjes in je canvas met een prikpen (of naald) en doe dat ook met je papieren katernen. Het handigste is om in één vel papier de gaatjes op de juiste plaats door te prikken en dit vel vervolgens als sjabloon te gebruiken om in de rest van de vellen de gaatjes te prikken. (Schuif het vel-met-gaatjes binnen in je volgende katern en prik de gaatjes door.)
Alles klaar? Dan kun je de katernen nu in gaan binden!
Ik liet deze inbind-techniek al zien in een vorige Quirky post (van 2015) dus ik verwijs je nu naar die oude blogpost, waar je een duidelijke uitleg/tutorial vindt (het laatste gedeelte van die post, even doorscrollen dus…)
Klik HIER voor de uitleg/tutorial van deze bindtechniek.
En zó ziet mijn ‘cahier-journal’ er uit, klaar voor gebruik.
Ik koos een vrolijk kleurtje draad (waxed cotton) voor de binding.
Veel plezier met het maken/binden van je eigen schrift-journaaltje!
Dit door mij gemaakte journal zal verloot worden onder een van de deelnemers van Quirky Dutch Summer. Ik kom daar in de laatste blogpost van de serie (12 augustus) nog op terug.
Heb je, geinspireerd door deze blogpost, iets gemaakt dat je wilt laten zien?
Gebruik dan de InLinkz lijst hieronder om een link naar je werk / blogpost achter te laten.
Je kunt je werk natuurlijk ook in de Quirky Facebook groep laten zien.
( Collection closed )
Link tool by Inlinkz










Oh wow, what a great tutorial. Love the bright and colorful cover, and this whole tutorial. Makes me wanna make books ASAP. So inspirational Marit!
Looking forward to following this series with happiness and interest.Quirky Dutch Summer in NZ winter 😉
Cool idea of the source for the canvas and your patterning so pretty. Enjoy your Summer xo
A very detailed tutorial! Sometimes you can buy canvas sheets – I’m pretty sure I have some lying around but I never knew what to do with them – great idea to make a cover with that lovely canvas texture AND you have the frame left over to play with as well, which would make a great shadow box!
What a wonderful tutorial Marit, you have given so many the basics to create and design any journal/album they wish, as they say the possibilities are endless. I love working on canvas sheets I buy them by the book but what a super idea to use those cheap canvas’s and the bonus is you have the frame saved for another project. Bold, beautiful and ever quirky design, all tided up with it’s happy summer coloured waxed thread..
So looking forward to spending time with you all during the Quirky Dutch Summer… Just need a little sunshine to go with it over in the UK xx
What a wonderful Dutch Summer beginning, dear Marit. I love what you have created. I only wish I had pinch grip so I could hold a needle to thread the wax linen. This turned out so pretty.
wat een super leuk idee zeg! ik heb hem ook gemaakt inmiddels. ‘k Had nog een blok met canvasdoek, ooit eens gekocht bij de Action, daar heb ik een vel van gebruikt met m’n favoriete kleuren. en wat een leuke binding zeg! heel erg bedankt voor de inspiratie.
Marit, your tutorial is absolutely wonderful. I hope that I get a chance to make a cover like this. Yours is just gorgeous! Thank you for sharing your talents here!
Super, deze tutorial. En de hele Quirky Dutch Summer vind ik ook een prachtig initiatief, trouwens. Ik heb ondertussen ook een boekje gemaakt. Een heel leuke en makkelijke techniek, precies wat ik graag heb…
Groetjes, Nele