Deze post in het NEDERLANDS lezen? Klik hier
| Quirky Dutch Summer Do you have no idea what ‘Quirky Dutch Summer’ is all about? Read this post first. All the posts – newest at the top, oldest down below – can be found here. There is a Facebook group for sharing your QDS work here. QDS wil run from June 15 – August 17; 2015. There will be an inspiring quirky post up on this blog every Monday during the Summer. |
QDS #7. Photos – used in another way
Some years ago, before I discovered Art Journaling, I was a ‘scrapbooker (see this guest post from 2011 on July Balzer’s blog: From Scrapbooking to Art Journaling.) In scrapbooking you find various styles. There are also new scrapbook lines coming out every season; scrapbooking papers in different designs, various embellishments to go with the paper lines and all kinds of related goodies that respond to the ‘spirit of the time’ because trends are the main stray of hobby-country where big money is made. At that time I wrote articles for a Dutch scrapbooking magazine and therefor I was well informed about the latest styles, brands and trends… but whether the talk of the town was “vintage” or “free style scrapping,” one thing stayed the same: the starting point. The basics of scrapbooking was and still is the use of photos.
Art Journaling is different. In art journaling we use all kinds of shapes and images to express our emotions. The use of (self taken) photos is no longer necessary to tell our story and so we don’t use photos much anymore. Or maybe we don’t use photos because it reminds us of scrapbooking and we want to express that we are ‘beyond that’ and more ‘artsy’??
In today’s post I will show you that there are more possibilities in using photos than “illustrate our story the scrapbooking way.” I found some inspiring examples of artists/art journalers who use photos as a starting point and then do something really special with it. In the examples, no photo remains untouched and yet they still remain recognizable as a photo… take a look:
Draw beyond your photo

The photo in this example is in itself not very special … a bit boring even. The way the drawing goes further where the photo stops, makes the image interesting. (I found the image here)
This example reminds me of one of my drawing lessons in high school. The teacher handed out ‘half heads’ (magazine/advertising pages with a portrait on, cut in half.) We had to glue the pages on drawing paper and draw the other side of the face.
Photographer Michelangelo Di Battista and illustrator Tina Berning are known for doing just that with their “Face project.” The series contains photos that have been extended/finished with painting and drawing techniques.
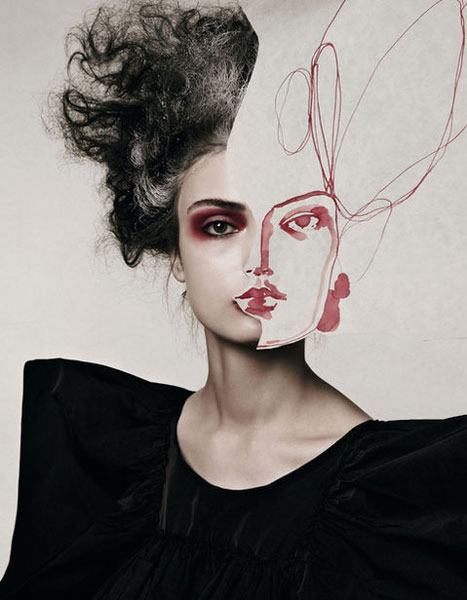
Photo or illustration?
Nikki Farquharson also used (parts of) photos in an unexpected way. She let her fantasy go loose!

In the examples shown above, you can still see the photo parts but when you look at Nikki’s website/art, you will find illustrations in which it is hard to find the photo that was taken as a starting point.
Extend your photo
One of my favorite artists in the field of extending photos is Stephanie Drömer
Stephanie draws, sews and uses all kind of mixed media materials and techniques to extend photos. She creates a whole new image that way.
Drawing ON your photo
Instead of expanding your photo, you could also use your photo as a background and add something to it, like a small drawing. This funny example is made by Eva Hof

Instead of drawing, writing on your photo is also a possibility. A few years back I started a series ‘Writing on/over Writers’ in which I use portrait photos of famous writers. I journal my opinion about the writer (or his/her books) on the portrait photo. (I should definitely pick up this project again and work on some more portraits soon…)

Part photo, part drawing
A combination of a photo and drawing; now that might perhaps look like this…

This piece is made by Ben Heine and on his website you will find many more similar examples.When you look at the photos closely, you will see that he probably uses the computer to manipulate some things (see the shadow of the drawing paper?) but it’s the idea that counts, isn’t it?!
While doing research for this blogpost, I got inspired by all the possibilities to use photos in my art journals so I took out my box with old photos and played!
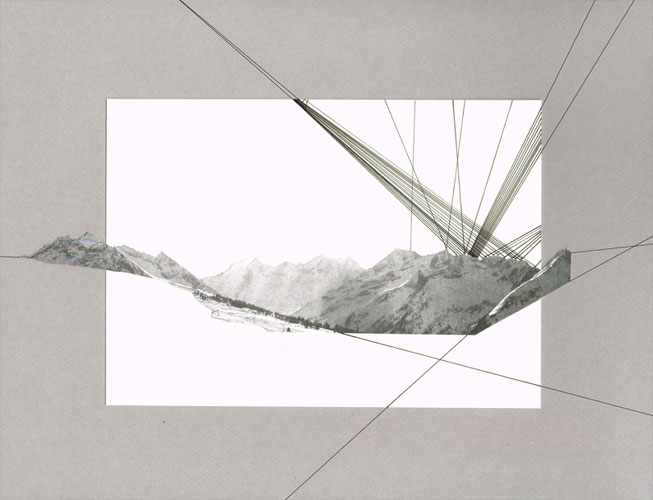
Page inspired by the art of Stephanie Drömer
- Find a photo with clear sight-lines (a building or landscape often works best.)
- Paste the photo on drawing paper (or in your journal) and extend the lines using a pencil and ruler.

- Use the pencil lines as a guide to stitch over it with your sewing machine (or, if you don’t have a sewing machine, embroider by hand.) I used black yarn but you can of course use colored yarn instead.

- Get rid of the loose wires by sticking them to the back or paste the loose threads onto the page (use glue, gel medium or mod podge) so that they make for additional lines. I did the latter, see next photo.

- Fill the open/white spaces as you like. I stamped a grid in two of the planes (to cite the grid of the fencing in the photo.) I draw lines with a fine point marker in some planes and painted a few with acrylic paint.
- Don’t fill all the planes. Keep looking at your composition and stop when it’s enough. (When that is? Well, that is always the question and challenge …)
Page inspired by the art of Nikki Farquharson (and also a bit by Michelangelo Di Battista and Tina Berning)
- Find a good photo of yourself. It can be a portrait or one that shows you from head to toe. I used this photo of myself to work with (photo taken in 1984, or so.)

- Use a part of the photo and draw, write, paste… in short DO something with it.

These are but a few examples of how you can use photos in your art journal or mixed media pieces. Now go on, take a photo and let your imagination run wild.
Did you create something inspired by this blogpost?
Use the InLinkz list at the end of this post to leave a link to your artwork/blogpost.
Nederlands
| Quirky Dutch Summer Heb je geen idee waar ‘Quirky Dutch Summer’ (Grillige, Hollandse zomer) over gaat? Lees dan eerst deze post. Alle ‘Quirky posts’ kun je hier op een rijtje vinden (de laatste post staat altijd bovenaan.) Quirky Dutch Summer heeft ook een eigen Facebook groep, die vind je hier. QDS duurt van 15 juni tot 17 augustus. Gedurende deze zomer zal er elke maandag een inspirerende, ‘Quirky post’ worden gepubliceerd op mijn blog. |
QDS #7. Foto’s – op een andere manier gebruikt
Een aantal jaren terug, voordat ik Art Journaling ontdekte, was ik een ‘scrapbooker’ (zie deze gastpost uit 2011 op Julie Balzer’s blog: From Scrapbooking to Art Journaling.) In het scrapbooken zijn er diverse stijlen en er komen ook elk seizoen nieuwe scrapbook lijnen uit; dessin papier met bijbehorende ’embellishments’ en andere aanverwante zaken die inspelen op de tijdsgeest want ja, ook in hobbyland kent men modes en daar wordt goed geld aan verdiend. Omdat ik in die tijd voor het tijdschrift “Creatief met Foto’s” schreef was ik goed op de hoogte van de diverse merken en modes… maar of de mode nu vintage of ‘free style scrappen’ voorschreef; één ding bleef bij het scrapbooken altijd hetzelfde: het ging om de foto’s.
In art journaling grijpen we naar allerhande beeldmateriaal om onze emoties tot uitdrukking te brengen, maar het gebruik van (eigen) foto’s is in art journaling niet meer zo gebruikelijk. Doet het ons teveel aan ‘scrapbooking’ denken misschien?
Vandaag laat ik zien dat er meer met foto’s mogelijk is dan “inplakken ter illustratie van een gebeurtenis”. Ik vond een aantal inspirerende voorbeelden van kunstenaars/art journalers die foto’s als uitgangspunt nemen, en er dan iets heel speciaals mee doen. Geen enkele foto blijft in de voorbeelden onbewerkt en toch blijven ze herkenbaar als foto… kijk even mee:
Tekenen waar de foto ophoud
De foto in dit voorbeeld is op zich niet zo heel bijzonder… een beetje saai misschien zelf. De manier waarop de foto is ‘doorgetekend’ maakt dat het een bijzondere afbeelding wordt. (Ik vond dit voorbeeld hier.)
Ik herinner me een tekenles op de middelbare school waarbij we een ‘half hoofd’ op een vel papier moesten plakken, en deze dan aftekenen…
Fotograaf Michelangelo Di Battista en illustrator Tina Berning staan hierom bekend!
Hun “Face project” bevat prachtige voorbeelden van foto’s die zijn uitgebreid/afgemaakt met schilder- en tekentechnieken.
Half foto, half illustratie
Ook Nikki Farquharson gebruikt delen van foto’s die ze dan verder ‘aftekent’, maar op een onverwachte manier!
De (stukken) foto die Nikki als uitgangspunt gebruikt zijn in bovenstaande voorbeelden nog wel te vinden, maar ze heeft ook werk waarin het echt zoeken is naar de ‘basis foto.’
Foto’s ‘uitbreiden’
Eén van mijn favoriete kunstenaars op het gebied van werken met foto’s is Stephanie Drömer
Dit kun je eigenlijk niet meer ‘doortekenen’ noemen… Stephanie tekent, naait en plakt met een foto als uitgangspunt. Laat ik het ‘foto’s uitbreiden’ noemen.
Tekenen OP foto’s
Iets heel anders nu… in plaats van je foto ‘uit te breiden’ kun je natuurlijk ook je foto als achtergrond gebruiken en óp je foto tekenen. Dit grappige voorbeeld is van Eva Hof
Ook op foto’s schrijven behoort tot de mogelijkheden! Ik startte ooit een serie ‘Schrijven over Schrijvers’ waarbij ik mijn mening en/of herinneringen aan (de boeken van) de schrijvers op foto’s van hun portretten ‘journalde’. (Ik zou er eigenlijk weer eens aan door moeten werken…)
Deels foto, deels tekening
Een combinatie van een foto en tekening… dat ziet er dan ongeveer zo uit…
Dit werk is van Ben Heine, die op zijn website nog veel meer van dit soort werk laat zien. Bij bestudering van zijn werk kun je zien dat hij één en ander waarschijnlijk wel een beetje digitaal manipuleert… de schaduw achter het tekenpapiertje verraad dat al een beetje… maar het gaat om het idee, nietwaar?!)
Ik ben weer helemaal in de ban geraakt van foto’s en het bewerken/verwerken ervan. Bovenstaande voorbeelden werkten ook voor mij inspirerend, dus afgelopen week dook ik in mijn fotodoos en ging aan de slag…
Pagina geïnspireerd op het werk van Stephanie Drömer
- Zoek een foto met duidelijke zichtlijnen (een gebouw of landschap werkt vaak het beste.)
- Plak de foto op een vel papier (of in je journal) en trek de lijnen met potlood en lineaal door.
- Gebruik je naaimachine om over de lijnen te stikken (of borduur met de hand.) Ik gebruikte zwart garen, maar je kunt ook gekleurd garen gebruiken natuurlijk.
- Werk de loshangende draden naar de achterkant weg of plak de draden als extra aanvulling op je beeld aan de voorzijde vast met lijm, gel medium of mod podge (ik deed het laatste, zie volgende foto.)
- Je kunt de vlakken vullen op elke manier die je wilt. Ik stempelde in twee vlakken een raster (om het ‘raster’ van het hekwerk op de foto terug te laten komen,) vulde een paar vakjes met streepjes (fineliner) en schilderde drie vlakken met acrylverf.
- Niet ieder vlak hoeft opgevuld te worden! Blijf kijken naar je compositie en stop wanneer het genoeg is. (Wanneer dat is? Tja, dat is altijd weer de vraag én uitdaging…)
Pagina geïnspireerd op het werk van Nikki Farquharson (en ook een beetje Michelangelo Di Battista en Tina Berning)
- Zoek een duidelijke foto van jezelf. Dat kan een portretfoto zijn, maar ook eentje waar je ten voeten uit opstaat. Ik gebruikte deze foto van mezelf als basis (genomen in, als ik ‘t goed heb, 1984.)
- Gebruik een deel van de foto en teken, schrijf, plak… kortom DOE er iets mee.
Dit zijn maar een paar voorbeelden van hoe je een foto in je art journal of mixed media werk zou kunnen integreren. Laat vooral je fantasie de vrije loop.
Heb je, geinspireerd door deze blogpost, iets gemaakt dat je wilt laten zien?
Gebruik dan de InLinkz lijst hieronder om een link naar je werk / blogpost achter te laten.
( Collection closed )
Link tool by Inlinkz
Leuke uitdaging.
Echt weer heel leuk verzonnen en gemaakt!
I love this post and want to experiment with all of it…b
WOW! This is one of the best, well it is the best articles I have read on this topic and very timely. I was NEVER a scrapbooker. I considered it the domain of mothers and grandmothers, a place to deposit photos about your kids. I was always into art/ visual journaling that started with travel journals. My search is always for new ways to journal and simple ways to add visual elements as I am not an artist.